Airsoft Pistols Black New Orange Front Tips With Light at the Bottom
Airsoft Pistols Black New Orange Front Tips With Light at the Bottom
The best Sova's arrows on Split. Learn the best pointer spots to assemble info on the enemy positions with Recon Bolt, or to defeat them with Shock Bolt.
-
Beware from mobile. All the pictures are optimized, but there are about sixty+ in this guide.
-
When explaining the pointer spots, I might use the virtually common callouts to indicate them.
More pointer spots:
-
Oasis
-
Bind
-
Ascent
-
Icebox
All the arrow spots have been recorded at low graphic settings to make certain that anybody is able to apply them. Note that some arrows might be harder to align at higher settings because of the added furnishings.
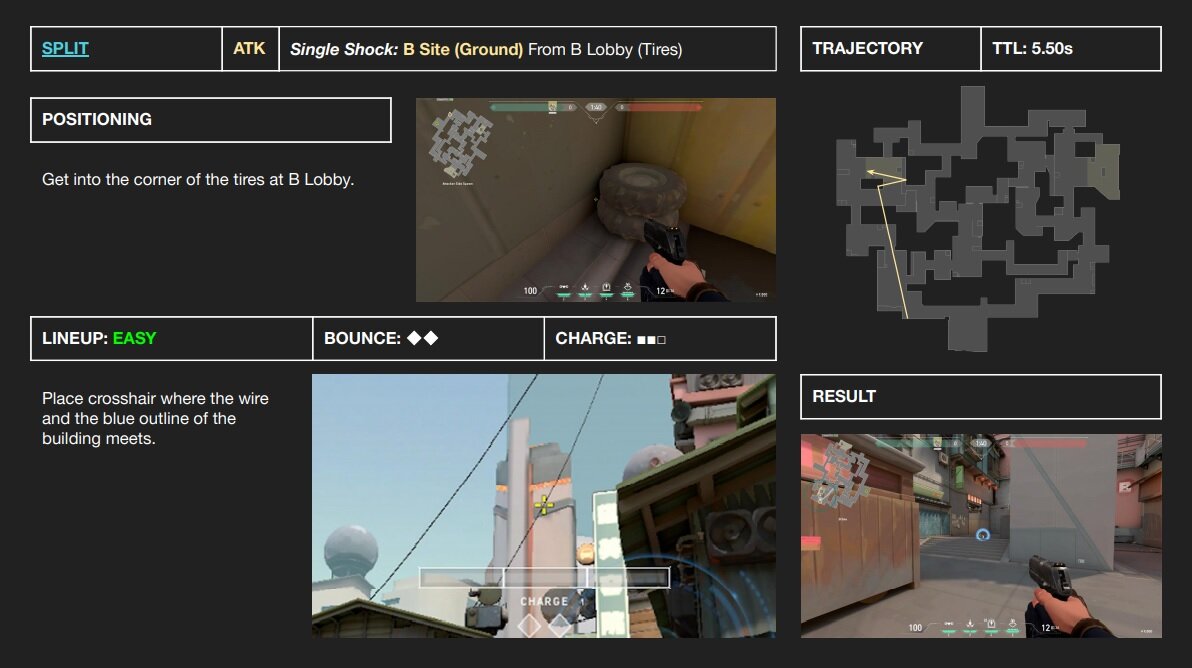
The following Split map shows all the arrow locations explained in this guide.
Recon darts: used to gather info on the positions of attackers or defenders. Fifty-fifty when destroyed, you will still know that at least an enemy is located in that expanse.
Stupor darts: used to defend the spike from a defuser, bargain with an enemy as they found the spike, or defeat them while they hide in mutual spots.
Each slide explains how to execute each pointer. Reading the instructions on the slides might exist hard from mobile, and then I have transcribed the text too. If you prefer audio over text, you tin can also heed to the commodity via the button in the intro.
Quick links
-
A - Attack
-
A - Defense
-
B - Assault
-
B - Defense
A Site arrows - Assault | Split
Recon bolts
A Ramps from A Cubby

-
Stand in this position on A Cubby.
-
Aim at near the top edge of this white part of the wall
-
Alternatively, leap and shoot with no charge to land around the aforementioned area.
A Ramps from Defender Spawn (A)

-
Stand on this lamp in Defender Spawn.
-
Marshal your crosshair with the pillar of the triangle on top of Ramps, and align the tips of your diamonds with the meridian of the shadow.
A Screens from A Anteroom

-
Go on peak of this box of A Lobby, correct on the corner.
-
Aim at the 2nd divider of the charge bar, slightly above the nighttime line of these hedges.
-
Endeavor to not go as well much above the peak of the square with the crosshair, or it volition country on the doorway into Screens instead of inside Screens.
This pointer will catch also whatsoever Operator user sitting back site behind the small-scale belfry.
A Site from A Lobby

-
Go on the first ledge and into the corner of A Antechamber.
-
Align the thicker tip of the HUD line with the elevation of this blue rectangle near the scaffolding.
A Tower (Inside) from A Lobby

-
Become on the first ledge and into the corner at A Lobby.
-
Place the crosshair on the bottom edge of the balustrade, slightly towards the right, as shown.
This arrow tin can spot enemies towards A Ramps.
Daze bolts
A Heaven from A Foyer

-
Get on the beginning ledge and into the corner at A Lobby
-
Align the crosshair with the calorie-free in the upper balcony, then move it slightly in a higher place the drinking glass console of the lower balcony, every bit shown.
A Ramps from A Lobby

-
Become on the first ledge and into the corner at A Lobby.
Pointer ane: Place the correct diamond centered to the blue edge of the edifice, in between the 2 lines. If the charge bar clears the left building, aim is at the correct height. You tin can aim a bit higher for a more than optimal placement.
Arrow ii: Move the crosshair down along the same blueish edges.
A Ramps from Defender Spawn (A)

-
Get into this corner of Defender Spawn about A.
Arrow 1: Aim at the lesser of the night outline of this leaf. It goes directly upwards from the white bar and looks almost eye shaped.
Arrow ii: Motion the crosshair down until y'all are simply above the white bar.
A Site Back Corner from A Cubby

-
Stand up on top of this planter box.
-
Align your right diamond in the height right corner of these bars.
A Site Dorsum Found from A Principal (Orb)

-
Stand up in this corner about the Orb in A Main.
Arrow 1: Align this role of the bottom correct HUD line halfway up this gradient on A Tower.
Arrow 2: Align your crosshair on the lower portion of this slope on A Tower.
A Site Dorsum Plant from A Ramp

-
Put your back somewhere along this position on the ramp.
-
Marshal the bottom left of the accuse bar with the corner made by the tower.
A Site Dorsum Plant from A Tower

-
Walk into this corner of A Belfry.
-
Aim halfway along this blue line. Going higher makes it closer to the wall.
A Site Default Plant from A Cubby

-
Stand in the corner next to the planter box.
-
Align your crosshair with the second bluish line, and align the top of the accuse bar with the bottom of this steel bar.
A Site Default Plant from A Belfry

-
Stand up on top of this planter box.
-
Marshal your correct diamond on peak of this bar, and also marshal it with the first blue line.
A Site Default Plant from A Tower

-
Get into the corner of the bin on A Tower. Hold Forward and aim the mouse to the right to guide the thespian model into a full stop.
-
Place the crosshair midway between the lower correct vertex of the "K" and the info console.
A Site arrows - Defense | Split up
Recon bolts
A Lobby from A Heaven

-
Get into the corner of the balcony on A Heaven.
-
Identify the crosshair at the vertex of the pole.
A Antechamber from A Heaven

-
Walk into this edge in Heaven.
-
Aim on this poster where the orange radianite meets the grey rock. Brand certain to aim slightly to the right so that it doesn't completely miss the affiche.
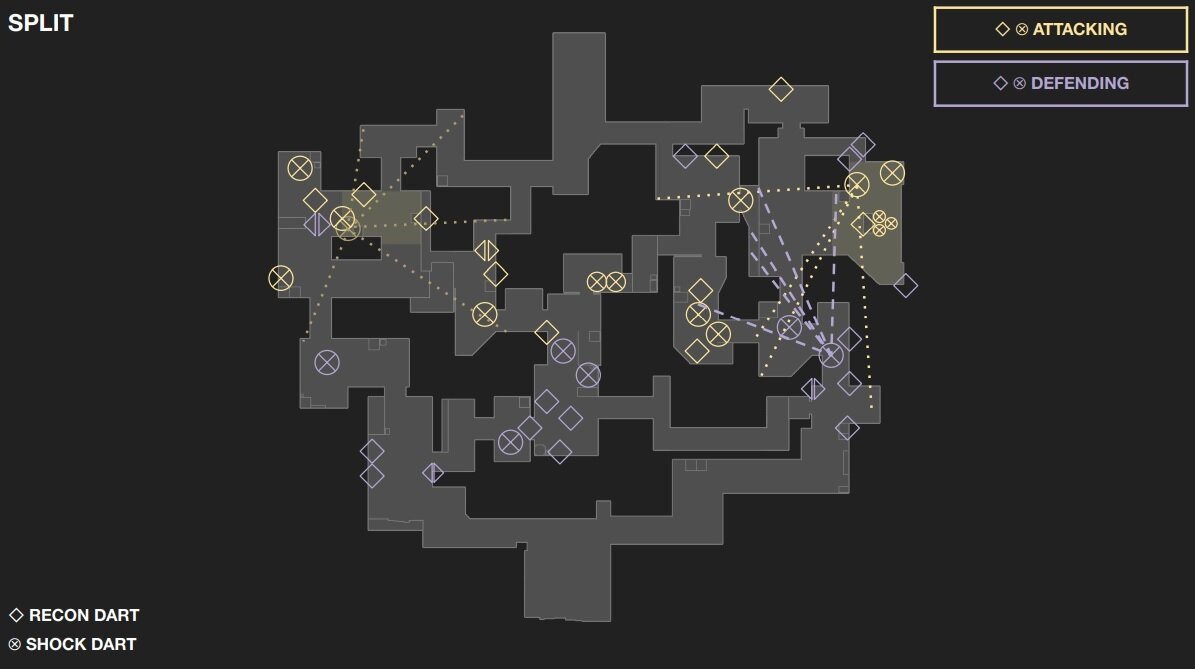
A Entrance hall from A Heaven
-
Walk anywhere in A Screens where you can see this affiche.
-
Aim on the meridian half of the poster, making certain to aim slightly right of the edge.
A Lobby from A Ramps (Box)

-
Get into the corner of the small night box at A Ramps (stay at ground level).
-
Place the crosshair at the vertex of the white wall and the wood panel.
A Lobby from A Site (Screens)

-
Get into this corner well-nigh Screens.
-
Aim in the heart of this A, halfway between the gap and the meridian tip of it.
A Site (Back) from Defender Spawn

-
Walk into this chair in Defender Spawn.
-
Place the tip of the Recon Commodities's HUD element on the bottom of this line on the belfry.
Make sure it is on the left border, otherwise it will bounce off the tower and go out of the map.
A Site (Back) from Defender Spawn

-
Walk against this wall in Defender Spawn.
-
Place the charge line above the third pillar.
A Site (Back) from Defender Spawn

-
Walk in betwixt the gap of these two shadows.
-
Aim the left tip of the 2d diamond in the centre of this triangle.
A Tower from Mid Postal service

-
Go up confronting the right wall at Mid Mail. Place the crosshair on the line separating outside and inside, as shown.
-
Place the crosshair to the vertex in the high ascension building.
This arrow goes through the ceiling and into A Tower. This beliefs doesn't announced to exist intended, only this arrow has been possible since version 0.47.
Daze bolts
A Main Archway from A Sky (Ledge)

Pointer 1
-
Stand under the tip of the 7 with a circumvolve with it.
-
Aim at the circle in the mark nether the 7.
Pointer ii
-
Stand under the vii with another line nether it.
-
Aim above the mark on the wall.
A Main Entrance from A Heaven (Ledge)

-
Stand at the edge of Heaven Ledge aligned with this wall (on the lesser edge).
Arrow one: Aim your crosshair on the left border of the night line, and the diamonds well-nigh half to two-third of the way of this section.
Arrow ii: Place the edge slightly inside the right diamond.
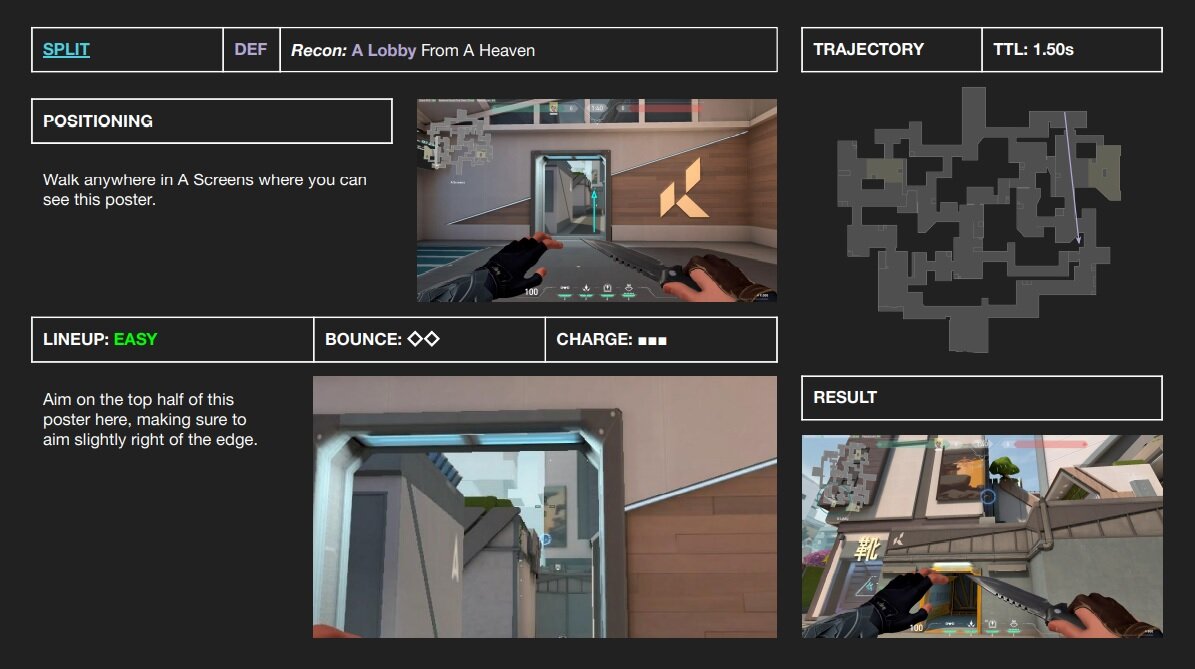
A Main Entrance from A Ramps (Box)
-
Get into the corner of the small-scale dark box at A Ramps (stay at ground level).
-
Marshal the crosshair horizontally to the line betwixt the white and dark-brown wall of the far building.
-
Align the crosshair vertically in the middle of the space between the woods panel and the board above it.
A Primary Entrance from A Site

-
Stand up in this corner of A Site.
Arrow ane: Aim to the right tip of this deject formation.
Arrow two: Aim direct downwardly from there, where the bottom of the cloud meets the green leaves.
A Principal Entrance from A Site (Hell)

-
Stand in this corner of Hell.
Arrow i: Place the left diamond on the meridian of this green hedge corner.
Arrow two: Identify this light in the eye of the second charge divider.
A Main (Orb) from A Ramps

-
Get into the corner at the entrance of A Ramps.
-
Align the crosshair to the eye of the diagonal wood panel. Aim a bit higher up the extruding edge.
This arrow can potentially explode on an enemy pushing upward A Ramps if they are in the flight path.
B Site arrows - Attack | Split
Recon bolts
B Rafters from B Entrance hall

-
Walk into the front end corner of these tires.
-
Align the HUD line on the left with the tiptop left corner of this bottom right window. (It but needs to be in this general area)
B Site (Dorsum) from Defender Spawn

-
Walk into this back corner of Defender Spawn.
-
Align the bottom left HUD line with this edge in the roof.
B Site (Blinds) from B Antechamber (Tires)

-
Get into the corner of the tires at B Lobby.
-
Place the crosshair just below where the building starts to cave in, as shown.
-
This pointer tin spot enemies on summit of the boxes on the left of B Garage Exit (B Site Trash).
B Tower from A Lobby (Bench)

-
Become into the corner of the bench at A Lobby.
-
Place the tip of the Shock Commodities icon on a vertex in the texture of the wall, as shown.
If the arrow isn't landing, move the tip up a pilus.
B Tower from B Link (Bulwark)

-
Get into the right corner of the barrier at B Link.
-
Aim the crosshair upwards. Place the tip of the Stupor Bolt icon on the roof, aligned with the forest edge on the right.
B Belfry from B Lobby

-
Walk into this box then that you lot get stuck on the edge of the yellow wall and the barricades.
-
Align this tip of your bow with the top of the lantern. It is a little forgiving, merely brand certain that it is touching the lantern's elevation left corner.
Mid Mail (Outer) from B Link (Drums)

-
Become into the corner of the drums room at B Link.
-
Place the tip of the HUD line at the vertex on the basis betwixt the white and xanthous tiles.
-
Move the tip a pixel to the right to land on the edge of the door frame, otherwise the arrow will enter Mid Mail service.
This arrow can spot both Mid Mail service and Mid Vent.
Stupor bolts
B Back from B Sky (Plant)

-
Become into the corner of the plant in B Tower.
-
Place the crosshair on the eye frame of the far window, every bit shown.
B Heaven (Mid) from B Link (Ramen)

-
Align with the edge of the second staircase.
Arrow 1: Align the crosshair with the elevation of the 2d circle from the bottom of this room ornamentation, and slightly to the right of the border of the rooftop.
Arrow 2: Align the crosshair with the bottom of the circumvolve.
B Site (Crates) from B Vestibule (Cabinet)

-
Get into the corner of the chiffonier at the entrance of B Link.
-
Place the tip of the Shock Bolt icon on the stud, two squares upward.
B Site Default Constitute from B Alley

-
Go into the corner at B Aisle.
-
Aim to the bottom right of this night spot on the wall.
B Site Default Institute from B Alley

-
Walk into this corner of Aisle with the turtle and bunny graffiti.
Pointer i: Aim at the leafage cluster betwixt these 2 leaves.
Arrow 2: Hunker and aim at the top left, as shown.
B Site Default Establish from B Garage

-
Become into the corner at B Garage.
-
Aim between the handlebars of the bicycle.
B Site Default Plant from B Sky (Stairs)

-
Marshal these two lines then that yous can barely run across the edge of the window.
-
Aim at the edge of the window, aligning it with the bottom of this Air conditioning unit.
B Site Default Institute from B Heaven (Stairs)

-
Hug the wall until you tin barely see the orange sign.
-
Aim at the top left edge of the sign.
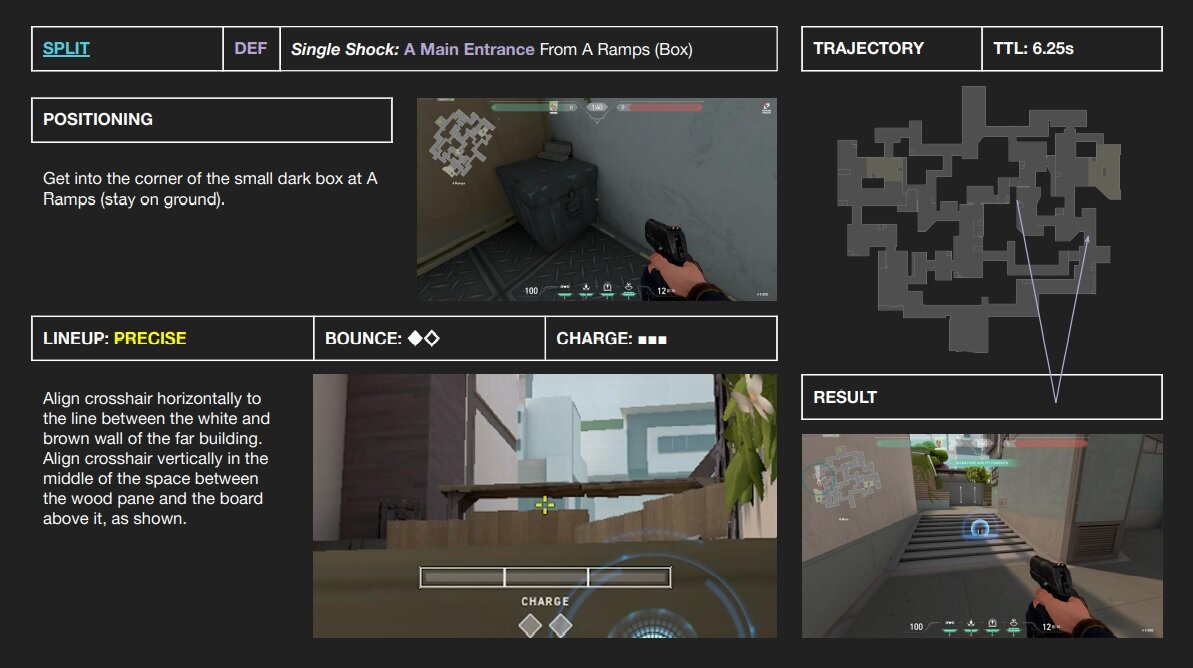
B Site (Ground) from B Lobby (Tires)
-
Get into the corner of these tires at B Lobby.
-
Place the crosshair where the wire and the bluish outline of the edifice see.
Mid Vent from B Link (Ramen)

-
Get into the corner of the ramen shop at B Link.
-
Place the crosshair on the left edge of the wood bar in the window.
Mid Vent from Defender Spawn

-
Get into the back right corner of Defender Spawn.
Arrow 1: Marshal the second charge divider on the center of this wooden axle. Leap and shoot.
Arrow 2: Align the diamonds on this roof corner.
B Site arrows - Defense | Split
Recon bolts
B Foyer from A Heaven

-
Bound onto this grey box.
-
Align the bottom left HUD line on the edge of this fence. It can be slightly above as information technology will land in the same area, but you must be precise horizontally.
Make sure that the crosshair is on the line.
B Lobby from B Back

-
Get into the corner at B Back.
-
Place the tip of the HUD line on the upper right vertex of the blue tile with a dot in information technology.
This arrow can spot enemies in B Link if in line-of-sight.
B Lobby from B Rafters

-
Line upwardly with this vent on B Rafters.
-
Aim at the heart of the sign beams, as shown.
B Lobby from B Site (Wooden Box)
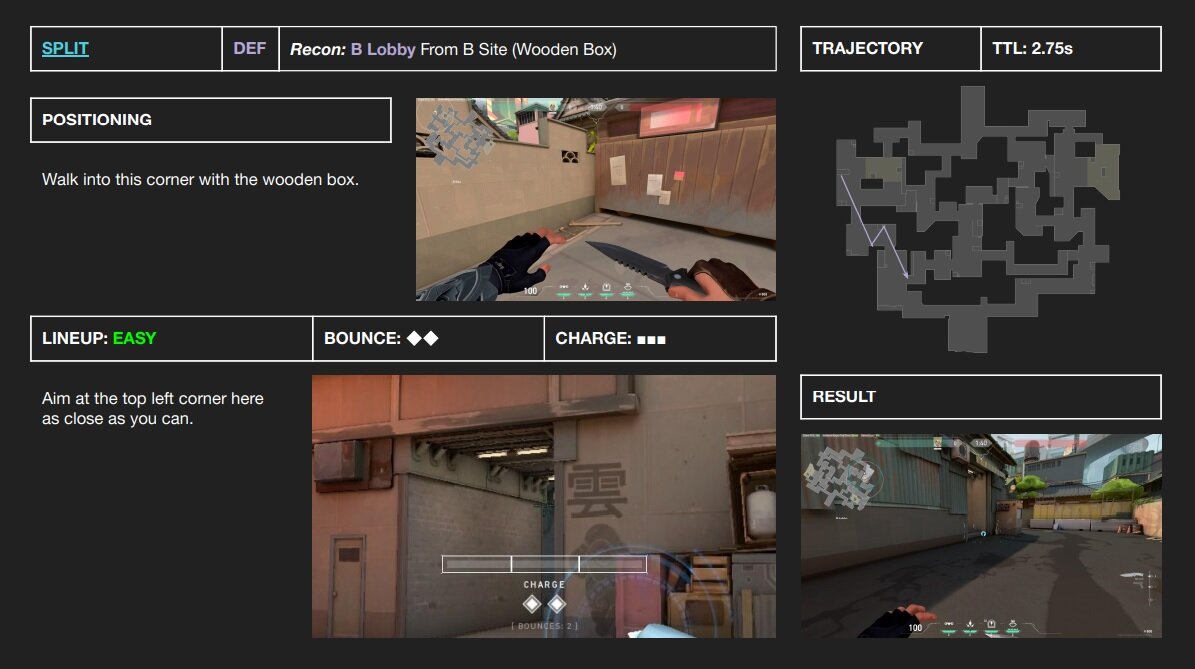
-
Walk into this corner with the wooden box.
-
Aim at the top left corner, every bit close as you tin.
B Site from Defender Spawn

-
Marshal with the light at Defender Spawn.
-
Align the Shock Commodities indicator at the lesser left of this box on the wall.
B Site from Defender Spawn

-
Walk into the edge of this wall, aligning with the line at the bottom.
-
Marshal the get-go diamond with the third beam on the rooftop, as shown.
Mid Bottom from A Heaven

-
Jump onto this greyness box.
-
Align the bottom left HUD line on the edge of this fence. It can exist slightly above every bit it will land in the same area, but you must be precise horizontally.
Make certain that the crosshair is on the line.
Mid Lesser from Mid Mail

-
Get into the corner of the plant in B Tower.
-
Aim the crosshair upwards, towards the rooftop.
-
Place the left tip of the HUD line on a white dot on the wall texture, as shown.
This pointer spot is quite lenient with precision.
Mid Bottom from Mid Mail

-
Walk into the border of the window.
-
Align the corner of the opening in the center of the 2nd diamond.
Mid Bottom from Mid Ropes

-
Walk into this corner in Mid Ropes.
-
Aim the corner of this bird, halfway up the dark edge.
-
Aiming besides low volition cause the arrow to go behind the wall, while aiming too high will cause the arrow to be more visibile. Get for higher rather than lower.
Shock bolts
B Garage (Orb) from B Back

-
Become into the corner of the woods structure at B Back.
-
Place the crosshair on the right edge of the right door frame.
-
Align vertically one-3rd of the way up from the handle to the peak edge.
B Link (Drums) from Mid Mail

-
Get into the corner in Mid Mail.
-
Place the crosshair on the correct edge of the nighttime grey texture, midway between the two orange triangles.
Mid Cubby from B Heaven (Mid)

Arrow 1
-
Walk under this B.
-
Marshal the top left of the accuse bar with the top left of this ring surrounding the pipe.
Arrow 2
-
Walk to the left until yous tin barely see this dot.
-
Aim slightly below the blue line here. Wait eight seconds.
Mid (Stairs) from Defender Spawn

Vincenzo "Skulz" Milella
Vincenzo is an esports writer with 7 years of experience. Quondam caput editor for Natus Vincere, he has produced content for DreamHack, FACEIT, DOTAFire, 2P, and more. Follow him on Twitter and Facebook .
Airsoft Pistols Black New Orange Front Tips With Light at the Bottom
Posted by: giancolaimpres.blogspot.com
0 Response to "Airsoft Pistols Black New Orange Front Tips With Light at the Bottom"
Post a Comment